YayBlogger.com
BLOGGER TEMPLATES

Sunday, 9 March 2014

Pistachio and Rose Meringues

As the magnolia trees are happily coming into bloom it is safe to assume that spring is on its way!  Henceforth, now is the opportune moment to embrace floral notes in your cooking by experimenting with the delicate flavours of rose, lavender and orange blossom.  Perhaps I am being overly optimistic but a little bit of springtime goes a long way and these characteristically Middle Eastern scents evoke memories of springs gone by, providing a feast for all the senses.


These bit sized meringues not only satisfy sugar cravings but are also a novel way of bringing a splash of colour to your table. 

Makes 25 meringues

-          3 egg whites
-          150g caster sugar
-          2 tsp rose water (Neilsen Massey is my preferred brand)
-          50g shelled, unsalted pistachio kernels
-          pink food dye (or the colour of your choice)
-          300ml double cream
-          2-3 tbsp icing sugar


Method:

1.      Preheat your oven to 150ºC.  Line a baking tray with silicone paper and whizz the pistachio kernels in a food processor until roughly chopped.  
2.      In a medium bowl whisk the egg whites. Start on a slow speed and gradually increase the speed as the whites grow in size until they have reached stiff peak.
3.      Whisk 1 tbsp of caster sugar into the stiff egg whites, bringing the mixture back to stiff peak.  Repeat this process 3 times and then gradually add the remaining sugar and 1tsp of rose water until it is fully incorporated.  Take care not to over whisk the mixture as this will cause sugar beading once the meringue has cooked.
4.      Paint 4 vertical lines down the length of the piping bag with a medium sized, circle attachment. 
5.      Fill the piping bag with the meringue mixture and pipe into ‘kisses’ approximately 1cm wide, leaving a 1cm gap between each.  Sprinkle with the pistachio kernels and bake for approximately 1hr and 2mins. 
6.      To test the meringue remove one from the oven, let it cool and then crack open the centre.  The meringue should be chalky throughout.  Remove from the oven and cool completely.
7.      Meanwhile, whip the cream to medium to stiff consistency, the cream will thicken when it is piped.  If you have over whipped your cream let it down with a splash of milk.  Add icing sugar and rose water to taste and pipe onto the cooled meringue through a small star shaped nozzle and sandwich together.   


Saturday, 20 July 2013

Falafel

In my Father’s rather biased opinion this recipe produces the best falafel he’s ever tasted, all credit going to Yotam Ottolenghi.  The rich, spicy aroma of these Middle Eastern nibbles is enough to make you salivate and when combined with hummus it can only be described as an exotic symphony dancing around your mouth, momentarily transporting you to Istanbul’s winding street markets


Makes around 20 balls

- 250g tinned chickpeas
- 1/2 a medium onion, finely chopped
- 1 garlic clove
- 1 tbsp finely chopped flat leaf parsley
- 2 tbsp finely chopped coriander
- 1/4 tsp chilli powder
- 1/2 tsp ground cumin
- 1/2 tsp ground coriander
- 1/4 tsp ground cardamom
- 1/2 tsp baking powder
- 1 1/2 tbsp plain flour
- approximately 750ml sunflower oil
- salt

Method:

1. Place the chickpeas, onion, garlic, fresh parsley and coriander and the dried spices in a food processor and whizz until it forms a grainy, well combined paste.
2. Add the baking powder, flour, salt and 3 tablespoons of water and blitz until the paste is smooth and uniform.  Leave the mixture in the fridge for an hour or until ready to use.
3. Fill a deep, heavy based saucepan with enough oil to come 7cm up the sides of the pan.  Heat the oil to 180ºC.
4. With wet hands, make balls slightly smaller than a golf ball and press them firmly to prevent them from breaking.
5. In batched deep fry the balls for approximately 4 minutes each or until golden on the outside and no longer wet in the middle.  It is important they dry in the middle so I would recommend doing a tester batch first.
6. Drain in a colander lined with kitchen paper and serve immediately.    


Tuesday, 7 May 2013

Spanakopita

It’s hard to imagine a more delicious combination than garlicy spinach delicately complimented by tangy feta and creamy ricotta.  This Greek staple is crammed with iron and calcium to keep your body fighting fit all year round.  It can be served as the plat principal alongside a crisp green salad, drizzled with lemon or wrapped up into small parcels and served as finger food during a warm summer’s barbeque


Serves 6

Cooking Time:  about 45 min, plus 5 min cooling

-         1 tbsp olive oil
-         1 medium onion, finely sliced
-         4 spring onions, roughly chopped
-         2 garlic cloves, crushed  
-         400g baby spinach
-         350g feta, crumbled
-         250g ricotta
-         2 medium eggs, lightly beaten
-         2 tbsp freshly chopped flat-leafed parsley
-         ½ tsp freshly grated nutmeg
-         Freshly ground black pepper
-         100g butter, melted
-         6 sheets filo pastry

Method:

1. Preheat the oven to 200ºC (180ºC fan), gas mark 6.  Heat the oil in a pan and gently fry the onion and garlic until softened.  Add the spinach, cover on a low heat and leave to wilt for approximately 5 min.  Set the spinach mixture aside to cool. 
2. Meanwhile, in a large bowl, combine the feta, ricotta, eggs, parsley, nutmeg, and pepper.  Add the cooked meat if you are using it.  Stir into the cooled, drained spinach. 
3. Brush the base of an 8 x 11inch pan with butter and lay down 3 or 4 sheets of filo pastry so they come half way up the sides of the dish, brushing melted butter between each layer to prevent them from separating whilst cooking. 
4. Evenly spread the filling over the filo base and top with the remaining layers of pastry.  Tuck in any excess pastry, brushing each individual sheet with the melted butter. 
5. Bake for 30–35 min until golden brown.  Leave to cool for 5 min.  Serve warm with a crisp green salad dressed with a drizzle of olive oil and a squeeze of lemon.


Chocolate Mousse

When the rich, bubbly texture of chocolate mousse hits my tongue I am immediately transported back to my childhood kitchen table.  It is reminiscent of my four siblings and I persevering through mounds of steamed broccoli in the hope that our courageous efforts would be rewarded with a delightfully chocolaty dessert that satisfied our sweet tooth.  This mousse does not disappoint, tingling every eagerly awaiting taste bud. 


Serves 4

- 165g good quality 70% chocolate
- 8 medium egg whites 
- 1/4 tsp lemon juice
- 20g sugar

Method:

1. Melt the chopped chocolate in a large heatproof bowl over a pan of simmering water.
2. Whisk the egg whites with the lemon juice on a medium speed until they form soft peaks.  Turn up the whisk to a high speed and gradually add the sugar.
3. Whisk until you get firm peaks then take a third of the egg whites and whisk briskly into the melted chocolate then immediately fold the remaining egg whites using a large spatula.
4. Pour the mousse into individual serving bowls or glasses and leave to set in the fridge for a minimum of 6 hours before serving.  

(recipe adapted from the Times Magazine)

Tapenade bruschetta

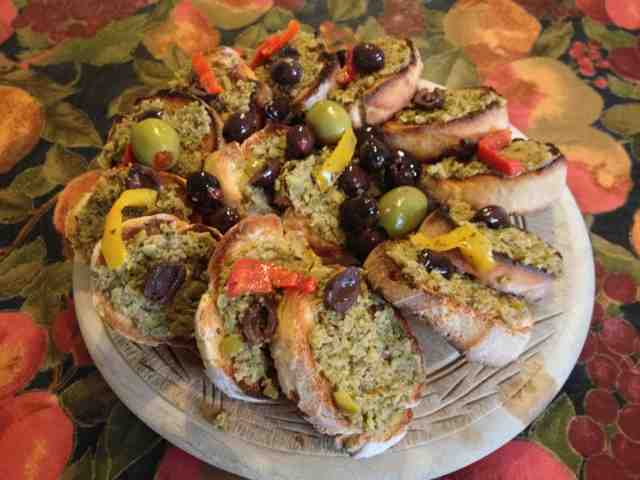
Tapenade is the taste of Provence, evoking images of swathes of purple lavender fields espousing their flirtatious aroma through the thick summer’s air.  What I love most about this brushetta is how the rich, bitter oil from the olive seeps through the dry bread to create a succulent crunch.  The ultimate domestic goddess would bake her own bread.  I however, am more than happy to use a good quality fresh loaf from a local bakery.


Method:


-          1 fresh baguette
-          200g tapenade (green or black depending on your personal preference) 
-          olive and marinated peppers to decorate
  1. Cut the baguette vertically so that each slice is approximately an inch thick
  2. Toast the slices of bread until golden
  3. Spread the tapenade generously over the toasted bread and garnish with sliced olives and marinated pepper. 

Gluten free dill and smoked salmon blinis

The ultimate party treat!  The extravagant combination of a glass of chilled, bubbly champagne and a smoked salmon blini are the kind of luxuries you can imagine being lavished upon the guests at Toad Hall in the Wind in the Willows.  But perhaps the real beauty in these delectable treats is the simplicity in their creation.


Makes approximately 30

- 12.5g yeast
- 350g gluten free, plain flour
- 285ml milk, lukewarm
- 2 egg yolks
- 145ml milk, tepid
- 4 egg whites, whisked
- chopped fresh dill

- 250g soured cream
- a packet of smoked salmon
- cooked prawns
- 1 lemon
- fresh dill to garnish
- salt and pepper

Method:

1. Make a thin paste out of the yeast and 225g of the sifted flour diluted with the lukewarm milk.
2. Leave the paste to ferment for two hours in a warm room atmosphere and then add the rest of the flour (115g), the egg yolk, a pinch of salt, the tepid milk, the chopped fresh dill and mix together without letting it acquire any body.  Finally add the egg whites of four whisked eggs.
3. Let the preparation ferment for half an hour, and when about to serve, cook the blini quickly in the same way as a pancake, in a lightly oiled frying pan, turning once risen and golden.
4. Leave the cooked blini to cool slightly then blob a teaspoon of soured cream on top and arrange the smoked salmon and cooked prawn.
5. Drizzle the blini with lemon, sprinkle with dill and season lightly.  

(recipe adapted from bbc food)