
Thursday 29 August 2013
Saturday 20 July 2013
Falafel
In my Father’s rather biased opinion this recipe
produces the best falafel he’s ever tasted, all credit going to Yotam Ottolenghi. The rich, spicy aroma of these Middle Eastern
nibbles is enough to make you salivate and when combined with hummus it can
only be described as an exotic symphony dancing around your mouth, momentarily
transporting you to Istanbul’s winding street markets

Makes around 20 balls
- 250g tinned chickpeas
- 1/2 a medium onion, finely chopped
- 1 garlic clove
- 1 tbsp finely chopped flat leaf parsley
- 2 tbsp finely chopped coriander
- 1/4 tsp chilli powder
- 1/2 tsp ground cumin
- 1/2 tsp ground coriander
- 1/4 tsp ground cardamom
- 1/2 tsp baking powder
- 1 1/2 tbsp plain flour
- approximately 750ml sunflower oil
- salt
Method:
1. Place the chickpeas, onion, garlic, fresh parsley and coriander and the dried spices in a food processor and whizz until it forms a grainy, well combined paste.
2. Add the baking powder, flour, salt and 3 tablespoons of water and blitz until the paste is smooth and uniform. Leave the mixture in the fridge for an hour or until ready to use.
3. Fill a deep, heavy based saucepan with enough oil to come 7cm up the sides of the pan. Heat the oil to 180ºC.
4. With wet hands, make balls slightly smaller than a golf ball and press them firmly to prevent them from breaking.
5. In batched deep fry the balls for approximately 4 minutes each or until golden on the outside and no longer wet in the middle. It is important they dry in the middle so I would recommend doing a tester batch first.
6. Drain in a colander lined with kitchen paper and serve immediately.


Tuesday 7 May 2013
Spanakopita
It’s hard to imagine a more delicious
combination than garlicy spinach delicately complimented by tangy feta and
creamy ricotta. This Greek staple is
crammed with iron and calcium to keep your body fighting fit all year
round. It can be served as the plat
principal alongside a crisp green salad, drizzled with lemon or wrapped up into
small parcels and served as finger food during a warm summer’s barbeque


Serves 6
Cooking Time: about 45
min, plus 5 min cooling
- 1 tbsp olive oil
- 1 medium onion, finely sliced
- 4 spring onions, roughly chopped
- 2 garlic cloves, crushed
- 400g baby spinach
- 350g feta, crumbled
- 250g ricotta
- 2 medium eggs, lightly beaten
- 2 tbsp freshly chopped flat-leafed parsley
- ½ tsp freshly grated nutmeg
- Freshly ground black pepper
- 100g butter, melted
- 6 sheets filo pastry
Method:
1. Preheat the oven to 200ºC (180ºC fan), gas mark 6. Heat the oil in a pan and gently fry the
onion and garlic until softened. Add the
spinach, cover on a low heat and leave to wilt for approximately 5 min. Set the spinach mixture aside to cool.
2. Meanwhile, in a large bowl, combine the feta, ricotta,
eggs, parsley, nutmeg, and pepper. Add
the cooked meat if you are using it.
Stir into the cooled, drained spinach.
3. Brush the base of an 8 x 11inch pan with butter and lay
down 3 or 4 sheets of filo pastry so they come half way up the sides of the
dish, brushing melted butter between each layer to prevent them from separating
whilst cooking.
4. Evenly spread the filling over the filo base and top with
the remaining layers of pastry. Tuck in any
excess pastry, brushing each individual sheet with the melted butter.
5. Bake for 30–35 min
until golden brown. Leave to cool for 5
min. Serve warm with a crisp green salad
dressed with a drizzle of olive oil and a squeeze of lemon.
Chocolate Mousse
When the rich, bubbly texture of chocolate
mousse hits my tongue I am immediately transported back to my childhood kitchen
table. It is reminiscent of my four
siblings and I persevering through mounds of steamed broccoli in the hope that
our courageous efforts would be rewarded with a delightfully chocolaty dessert
that satisfied our sweet tooth. This mousse does not disappoint, tingling every eagerly
awaiting taste bud.

Serves 4
- 165g good quality 70% chocolate
- 8 medium egg whites
- 1/4 tsp lemon juice
- 20g sugar
Method:
1. Melt the chopped chocolate in a large heatproof bowl over a pan of simmering water.
2. Whisk the egg whites with the lemon juice on a medium speed until they form soft peaks. Turn up the whisk to a high speed and gradually add the sugar.
3. Whisk until you get firm peaks then take a third of the egg whites and whisk briskly into the melted chocolate then immediately fold the remaining egg whites using a large spatula.
4. Pour the mousse into individual serving bowls or glasses and leave to set in the fridge for a minimum of 6 hours before serving.
(recipe adapted from the Times Magazine)
Tapenade bruschetta
Tapenade is the taste of Provence, evoking
images of swathes of purple lavender fields espousing their flirtatious aroma
through the thick summer’s air. What I
love most about this brushetta is how the rich, bitter oil from the olive seeps
through the dry bread to create a succulent crunch. The ultimate domestic goddess would bake her
own bread. I however, am more than happy
to use a good quality fresh loaf from a local bakery.
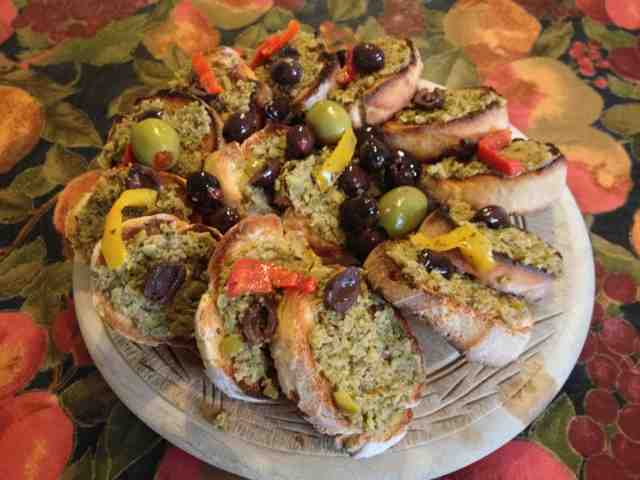
Method:
- 1 fresh baguette
- 200g tapenade (green or black depending on your personal preference)
- olive and marinated peppers to decorate
- Cut the baguette vertically so that each slice is approximately an inch thick
- Toast the slices of bread until golden
- Spread the tapenade generously over the toasted bread and garnish with sliced olives and marinated pepper.

Gluten free dill and smoked salmon blinis
The ultimate party treat! The extravagant combination of a glass of
chilled, bubbly champagne and a smoked salmon blini are the kind of luxuries
you can imagine being lavished upon the guests at Toad Hall in the Wind in the
Willows. But perhaps the real beauty in
these delectable treats is the simplicity in their creation.

Makes approximately 30
- 12.5g yeast
- 350g gluten free, plain flour
- 285ml milk, lukewarm
- 2 egg yolks
- 145ml milk, tepid
- 4 egg whites, whisked
- chopped fresh dill
- 250g soured cream
- a packet of smoked salmon
- cooked prawns
- 1 lemon
- fresh dill to garnish
- salt and pepper
Method:
1. Make a thin paste out of the yeast and 225g of the sifted flour diluted with the lukewarm milk.
2. Leave the paste to ferment for two hours in a warm room atmosphere and then add the rest of the flour (115g), the egg yolk, a pinch of salt, the tepid milk, the chopped fresh dill and mix together without letting it acquire any body. Finally add the egg whites of four whisked eggs.
3. Let the preparation ferment for half an hour, and when about to serve, cook the blini quickly in the same way as a pancake, in a lightly oiled frying pan, turning once risen and golden.
4. Leave the cooked blini to cool slightly then blob a teaspoon of soured cream on top and arrange the smoked salmon and cooked prawn.
5. Drizzle the blini with lemon, sprinkle with dill and season lightly.
(recipe adapted from bbc food)
Saturday 6 April 2013
Charity Cake Sale for Childreach International
In its starring role in an episode of Sex and
the City, Magnolia’s Bakery, Greenwich Village, New York, sparked the
international cupcake craze. This edible
piece of transient art provides a feast for both the eyes and the mouth. Having tried and tested numerous recipes the
Hummingbird Bakery Cook Book is undeniably the best. My personal copy is now lathered in stale
cake mixture and sticky fingers. This
basic vanilla sponge is as light as air and relatively low fat as far as cakes
go (minus the icing).


.jpg)
.jpg)


Makes 12
- 120g plain flour
-140g caster sugar
- 1 1/2 teaspoons baking powder
a pinch of salt
- 40g unsalted butter, at room temperature
- 120ml whole milk
- 1 egg
- 1/4 teaspoon vanilla extract
- 250g icing sugar
- 80g unsalted butter, at room temperature
- 25ml whole milk
- a couple of drops of vanilla extract
Method:
1. Preheat the oven to 170ºC.
2. Beat the flour, sugar, baking powder, salt and butter together with an electric whisk until you get a sandy consistency and it is well combined.
3. Gradually pour in half the milk and beat until fully incorporated.
4. Mix the the egg, vanilla extract and remaining milk in a separate bowl then pour into the flour mixture and beat for a couple of minutes until the mixture is smooth.
5. Spoon the mixture into paper cases until two thirds full and bake in a preheated oven for 20-25 minute, or until lightly golden and the sponge bounces back when touched. A skewer inserted into the middle should come out clean.
6. Leave the cupcakes to cool slightly in the tray before turning out onto a wire cooling rack to cool completely.
7. Meanwhile beat the icing sugar and butter together with an electric whisk until the mixture comes together and is well mixed. Turning the whisk down to a slow speed gradually pouring in the milk and vanilla extract.
8. Once the mixture is well incorporated turn the whisk up to a high speed and beat until light and fluffy for approximately 5 minutes. The longer the icing is beaten the lighter and fluffier it becomes.
9. Spoon or pipe the vanilla icing on top of the cooled cakes and decorate to your taste.

.jpg)
.jpg) |
| Gluten and Lactose Free Mini Victoria Sponges |
.jpg)
.jpg)
.jpg)
The Art of Michelin Star Cookery - A Day at the Waitrose Cookery School
+-+Copy.jpg) |
| Prawn and Leeks with a Bisque Foam |
+-+Copy.jpg) |
| Sous-vide Venison Steak with Black Pudding and a Celeriac Purée |
.jpg)
.jpg) |
| Tiramisu |
Homemade White Loaf
Bread is one of life’s scrumptious staple foods. The simple combination of bread smeared in butter
or gently dipped in a good olive oil proves that food doesn't have to be
complicated to delight any gourmet’s taste buds. As a child I remember thinking that Edmund
from the Lion the Witch and the Wardrobe could have suffered far more
distasteful combinations than bread and water in his punishment under the White
Witch’s wrath. This traditional loaf has
a soft and fluffy centre, a thick crust and is at its most delicious straight
out the oven.
.jpg)
- 675g strong white, granary or wholemeal flour
- 2 teaspoons of salt
- 20g butter
- 20g fresh yeast
- 450ml water, lukewarm
Preheat the oven to 220ºC (200ºC fan oven)
1. Grease the loaf tins or the baking tray.
2. Measure the flour into a large bowl, add the salt and rub in the butter until the mixture resembles fine breadcrumbs.
3. Make a well in the centre, crumble in the fresh yeast and then pour in the water.
4. Mix by hand and knead into a ball in the bowl.
5. Turn out onto a clean, lightly oiled surface (this will stop the dough from sticking) and knead for approximately 4 minutes (brown bread will not require as long). Return the dough to the bowl, cover with cling film and leave to rise in a warm environment for around 1-1 1/2 hours until the dough has doubled in size.
6. Knock back the dough and knead again for 2-3 minutes then either divide into tins or place onto the baking tray. Cover with lightly oiled cling film and leave to prove for around 30 minutes.
7. Remove the cling film and slide the bread into the preheated oven. To give the bread a thick crust place a tray of boiling water in the bottom of the oven to create steam.
8. Bake the loaf for approximately 30 minutes until evenly browned and a hollow sound is made when the loaf is knocked on the base.

(this recipe has been adapted from Mary Berry's Aga Cookbook)
Lemon Curd
Lemon curd evokes childhood memories of grubby
spoons being dipped into jars of tangy, yellow goodness in an attempt to
satisfy an unrelenting sugar craving.
Whether poured into sweet pastry cases, piped into Madeline’s hot out
the oven, or smothered over warm, buttered toast, lemon curd is an undeniably
delicious treat that is simple yet effective to make.

- Finely grated zest and juice of 1 unwaxed lemon
- 40g sugar
- 45g butter
- 2 egg yolks
- a pinch of salt
Method:
1. Put the lemon zest and juice, salt, sugar and butter into a saucepan and heat gently until the sugar and butter have melted. Remove the pan from the heat.
2. Whisk the egg yolks in a bowl, then add to the pan and whisk vigorously. Pour through a sieve and return to the pan.
3. Return the pan to a low heat and whisk constantly until the curd starts to thicken. Don't stop whisking or the egg will curdle.
4. Once the curd thickens and releases a bubble or two remove from the heat.
5. Pour into a sterilised jar and and place cling film in direct contact with the curd to stop a skin from forming. Once cooled put the lid on the jar and store in the fridge.
Friday 4 January 2013
Salted Caramel Macaroons
Macaroons. Need I say more? Served on the lavish tables of Versailles,
macaroons are not only the food of Kings and Queens but in my humble opinion,
the food of the Gods. It is no wonder
Marie Antoinette is defined by the term, “let them eat cake” considering the
delectable luxury in every nibble of these bite sized delights. I lost my macaroon virginity on the
picturesque shores of Lake Annecy at the patisserie attached to the Michelin
Star restaurant Auberge Du Pere Bise in Talloires Bay. Surrounded by unrivalled beauty and biting
through the crisp shell to discover the velvety pistachio filling I thought I
had died and gone to heaven, and so began my macaroon obsession.


Outside of London, a good British
macaroon is few and far between. Thus,
the burden rested on my shoulders to attempt to recreate my Annecy
experience. I have made macaroons on
four occasions with varying success. My
first attempt was definitely a case of beginners luck as my perhaps arrogant second
round failed miserably leaving me with irregular and soggy shells. Having learnt from my past mistakes it is
crucial not to over beat the egg white or let the syrup go over 110ºC.
The recipe below is for salted caramel
macaroons which are relatively easy to make but require time, patience and a top
secret ingredient, love.
Makes 50 mini macaroons
Shells:
- 200g ground almonds
- 200g icing sugar
- 80ml water
- 200g caster sugar
- 2 x80g egg whites
- Caramel food colouring or coffee extract mixed
with a couple of drops of yellow food dye.
Salted Caramel Filling:
Salted Caramel Filling:
- 250g icing sugar
- 80ml water
- 120g full fat crème fraiche (reduced fat has too
great a water content)
- 200g salted butter, cut into small cubes.
Method:
1. Sieve
together the ground almond and icing sugar.
If some of the almond is too grainy then pop it into a food processor to
refine it.
2. Stir
in 80g of egg white and the food colouring to the icing sugar and almond
mixture to create a thick paste (be sure to measure the egg whites to get the
exact measurement. This should be just
over 2 large egg whites).
3. Pour
the caster sugar and water into a heavy-based saucepan. Stir initially so that all the sugar is
coated in water but then leave to rest until it reaches 100ºC.
4. Whisk
the second 80g of egg whites until they are stiff with peaks. When the sugar reaches 110ºC gradually pour a
thin trail of the syrup into the egg whites beating continuously. The mixture should grown in volume and retain
the air pockets previously created during the whisking. If the mixture goes flat and runny restart
this process.
5. Gently
fold a third of the mixture into the almond paste to loosen it, making it more
pliable. In a figure of eight movement,
carefully fold the remaining egg white mixture into the paste, trying to retain
the air pockets in the meringue.
6. On
a tray, lined with greaseproof paper, pipe the shell mixture into disks dependent
on how large you want your macaroons to be.
I would recommend slightly larger than a 2 pence coin.
7. Leave
to sit for an hour to dry out the shells.
8. Meanwhile,
prepare the caramel. On a low heat bring
the icing sugar and water slowly to the boil until it turns a golden
brown. Add the crème fraiche, little by little,
stirring thoroughly to stop the caramel from cooking. Once the temperature reaches 108ºC take it
off the heat and add the cubed butter.
Stir until full incorporated.
Pour into a large dish and place in the fridge to cool.
9. In
a preheated oven of 145ºC (fan oven 125ºC), Gas Mark 1 ½ cook the dried shells
for exactly 13 minutes.
10. Once
cooked slide the greaseproof paper onto a damp surface as this will loosen the
shells, preventing them from sticking when taken off.
11. Pipe
the caramel filling (which should be thick but workable) onto half the shell
and sandwich together with the remaining shells.
To present, I either sprinkle icing sugar and cocoa power or
a delicate dusting of edible glitter on top to give them that little something
extra.
Macaroons are a great gift and a stunning teatime
treat.


Thursday 3 January 2013
Moelleux au Chocolat
 |
| The finished product |
What
better time to start a food blog than the beginning of a new year? 2013 is bursting with exciting new opportunities
and challenges and to embrace it with open arms I celebrated with a feast for
both the eyes and the stomach. I first discovered the deliciously decadent Moelleux au Chocolat on a snowy mountainside in a quaint French alpine village. Consisting of a
rich chocolate batter that is slightly undercooked to create a soft outer
sponge and an oozing lava middle they are undoubtedly my family's favourite dessert. Needless to say, this New Years Eve treat went down a storm!
The recipe I found that did this heavenly dessert justice originated from Rachel Khoo’s, The
Little Paris Kitchen, a beautiful book filled to the brim with unique takes
on classic French cuisine. I love
everything about this book, from the striking pictures of French markets
meandering down Paris’s cobbled streets to the grainy texture of the pages. This is the first dessert I’ve tried from her
collection and gauging from its success around the dinner table, it will not be
the last.
The
Moelleux are simple but effective!
-
170g good quality 70% chocolate
-
170g salted butter, cubed
-
170g soft light brown sugar
-
85g plain flour
-
6 eggs, beaten
- 6 ramekins, buttered and dusted with cocoa powder to prevent the moelleux from sticking when turned out.
Method:
1. Melt the chocolate and butter in a bain marie.
2. Once melted, whisk in the eggs followed by the flour and sugar.
3. Stir until all ingredients are well combined and divide the
mixture between the prepared ramekins.
4. It is then advised to refrigerate them for at least an hour to
cool the mixture. This is essential in
achieving the gooey centre as it takes longer for the heat to penetrate the
batter.
5. Place the cooled moelleux
in a preheated oven of 180ºC and bake for 15-20 minutes until there is a set
sponge on the outside and a skewer comes out chocolaty when inserted into the
centre.
6. Leave to cool for 2 minutes before turning out. If the ramekins were well buttered and dusted
then the moelleux should slip out
easily.
My
moelleux were not as runny in the
middle as I had hoped. In future I would
recommend cooking them for slightly under 15 minutes if refrigeration was
limited to an hour as they lacked the va va voom of the lava centre.
You may have spotted the little macaroon inconspicuously lurking on the side of the plate. Tomorrow, in a welcome break from my exam revision I will be blogging about the perils and triumphs that characterise the art of macaroon making.
Subscribe to:
Posts (Atom)
.JPG)


.JPG)